All that we can achieve with relative ease using the Standard Report Wizard can also be managed manually using a Blank Report.
The main advantage of using a Blank Report is that you have complete control over the design of the report from the very start: the Wizard makes the creation of a report quite simple, but it does have some limitations. For instance, creating a group using the Wizard allows only very basic adjustments and fine-tuning of the group; using a Blank Report gives you the full range of Crystal Reports Designer functionality to configure a group.
Tip: Despite its limitations, the Wizard is often the most convenient way to start a report, and in some instances it is all that is required to produce a useful report. Even if the flexibility of a Blank Report is required, it may be more efficient to create the report with the Wizard and then tweak it manually.
However there will be situations in which you will want to create a report without the assistance of the Standard Report Wizard, or in which you will need to tweak a Wizard-created report manually.
The following example runs quickly through the steps for creating a Blank Report. We look in more detail at how to edit and modify a report manually here.
- On the Start Page of the Crystal Reports Designer, select Blank Report under the New Reports heading
-OR-
Select File>New>Blank Report from the Menu bar.
The Database Expert box displays:
Tip: Click Help, available on each screen in the Database Expert, for more detail about each step in the creation of a report.
The following steps depend on the report Type you are creating:
 Crystal Report
EMu uses ODBC (Open Database Connectivity) to connect with Crystal Reports and it is necessary to identify the ODBC data source for the EMu module for which you are designing the report.
- Double-click Create New Connection.
- Double-click ODBC (RDO) to display the ODBC (RDO) box.
- Select the appropriate database file from the Data Source Name box.
In this example, we select EMu Catalogue:
- Click Finish to close the ODBC (RDO) box.
A new folder, called EMu Catalogue, is now listed beneath the ODBC(RDO) folder:
The content of EMu Catalogue is drawn from:
C:\Users\[username]\AppData\Local\KESoftware\Reports\ecatalogue
which is updated any time a report is run in the Catalogue module in EMu.
- Select the table(s) under the ODBC (RDO) folder to include in the report.
Note: As we have seen, one or more .csv files are generated when we run a report in EMu: the main .csv file and a separate .csv file for any field that is a table of values or for any group (see 2. Select the fields to include in the report: the Fields tab for details).
In this example two .csv files have been generated: ecatalogue.csv (the main .csv file) and Group1.csv.To include all .csv files for a particular data source, select the data source under the ODBC (RDO) folder (e.g. EMu Catalogue) and click the double arrow
 button.
-OR-
To move a single .csv file across to the Selected Tables list, select the .csv file (e.g. ecatalogue.csv) and click the single arrow
 button.
In this example we only move the main .csv file, ecatalogue.csv, to the Selected Tables list:
Group1.csv contains values from fields that we grouped in EMu. These fields are tables of values (they can hold more than one value) and we need to add this data to our report using a subreport. See the IMPORTANT note on The Links screen for the reason why we use a subreport to include values in Group1.csv rather than adding Group1.csv to the Selected Tables list here.
Note: The Links tab will be added to the Database Expert if two or more related .csv files were added to the report. If so, it is necessary to confirm the linking relationships on the Links screen.
- Click OK to continue.
The Links screenNote: The Link screen only displays if two or more tables (.csv files) were added to the Selected Tables list. In this example only one table was added to the Selected Tables list so the Links screen would not have displayed. The demonstration below is included in order to show how to use the Link screen but the changes made here will have no bearing on the remainder of this example.
The Links screen is used to configure the links that join the tables (the .csv files) included in the report. Tables are linked by common key fields, in this example, ecatalogue_key:
This is not the place to describe in detail how Crystal Reports manages links between tables, but a quick overview may suffice.
Although Crystal understands that the tables are linked together, it does not always link them in the most useful way. Generally it makes sense to think of the direction of a link as being from the primary table - notionally the table on the left hand side - to a lookup table. In the example above, Crystal has not identified ecatalogue_csv as the primary table and, as we'll see, it has applied a default Join / Link type of Inner Join, which is not particularly useful.
If we click Link Options, we find that there are four possible Join types in Crystal Reports.
Note: The Link Options button will be greyed out and inaccessible until a link between two tables is selected (click the link to select it - it will turn blue).
The four Join types are:
- Inner Join
- Left Outer Join
- Right Outer Join
- Full Outer Join
Each Join type specifies different conditions for determining which records will display in a report. As an example, consider this Inner Join scenario: Table A is the primary table, with links to records in Table B (the direction of the link is Left to Right / Table A to Table B). If the Join type is Inner Join, only records in Table A that have a link to a record in Table B will be listed in the report. If a record in Table A does not link to a record in Table B, it will not be displayed in the report.
Note: The default Join type in Crystal Reports is Inner Join: this may not display all the records on which you wish to report.
In this example, for all Table A records to be listed in the report whether or not they are linked to a record in Table B, it is necessary to select the Left Outer Join option.
Important: If records in Table A link to two or more records in Table B (in other words, the field stored in Table B is a table of values, such as Other Names: (Person Details) in the Parties module), it is more appropriate to create a subreport to add records in Table B. Using the method described below, if a record in Table A links to three records in Table B, the Table A record will be listed three times in the report.
For example, Table A records the last name of a Party (Smith). Table B records the Party's Other Names (Smithy, Smit); if we link the tables as described below, two records would be listed in the report containing: 1. Smith Smithy 2. Smith Smit. If you create a subreport for Table B and link that to Table A, our Table A record will be listed once only, but will include both Table B values. See How to add a subreport for details.To correct the direction of Joins and to specify an appropriate Join type:
- Click Clear Links.
A dialogue box displays:
- Click Yes to continue.
The links are removed from between the various tables.
- Position the primary table on the left.
- In the primary table, select the key field ecatalogue_key in this example) and drag it over the equivalent field in each lookup table:
Note: Lookup tables may themselves link to other Lookup tables using another key field and it will be necessary to specify these links too.
- Select the link between two tables (it will turn blue).
- Click Link Options to display the Link Options box.
- Select a Join Type radio button:
Note: If in doubt, use the Left Outer Join option: "The result set from a Left Outer join includes all the records in which the linked field value in both tables is an exact match. It also includes a row for every record in the primary (left) table for which the linked field value has no match in the lookup table."
- Click OK.
If required, repeat for all links between tables.
Note: Note that the links now indicate the direction of the Join (Left to Right).
- Click OK to close the Database Expert.
Next we design and format the report in Crystal Reports Designer.
Crystal ADO ReportNote: A Developer Edition of Crystal Reports Designer is required in order to create an ADO Crystal Report or convert a Crystal report to use ADO rather than ODBC. More details here.
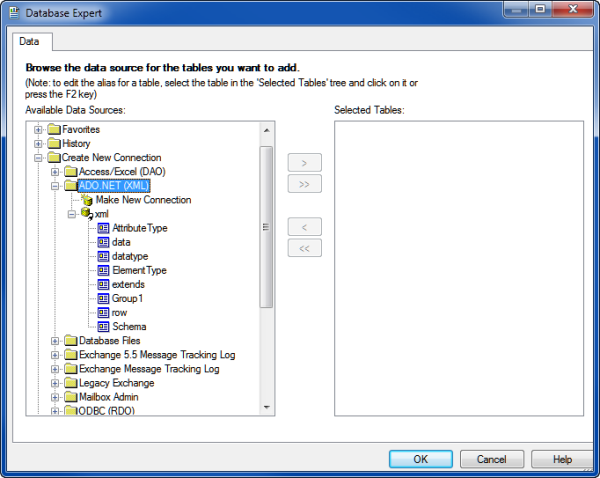
- Expand Create New Connection and then expand ADO.NET (XML).
The following screen will display:
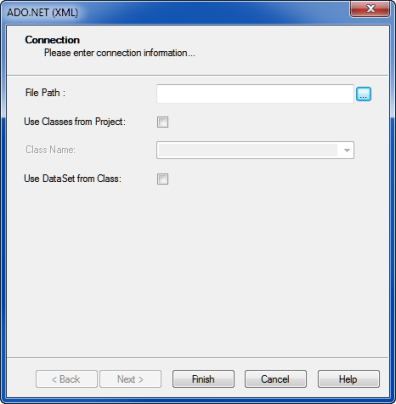
- In the File Path field, locate and select the xmldata.xml file created when the report was first run.
- Click Finish to return to the Database Expert:
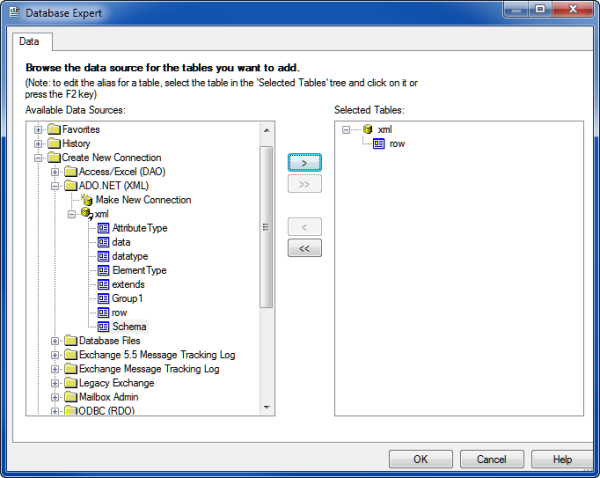
- Select row and add it to the Selected Tables pane:
- Click OK.
File locationThe location of this file can vary, but typically it can be found in:
C:\Users\[your username]\AppData\Local\KESoftware\Reports\e[module name]
For example, a report run in the Parties module, will save the xmldata file to:
C:\Users\[your username]\AppData\Local\KESoftware\Reports\eparties
Tip: More details about the location of the xmldata file can be found here.
Tip: In the screen image above, Group1 contains values from fields that were grouped when fields were added to the EMu report. These fields are tables of values (they can hold more than one value). It is necessary to use a sub-report to add this data to the report.
Field values from the Catalogue are contained in the xml table called row.
The Crystal Report Designer displays, ready for you to design your Crystal report.
Note: It is important not to move the
xmldata.xmlfile as this will cause problems when sharing the report with other users.
- If the Field Explorer does not display in the right-hand pane of the Crystal Reports Designer:
Click the Field Explorer
 icon in the Standard Toolbar
-OR-
Select View>Field Explorer from the Menu bar.
The Crystal Reports Designer window should appear similar to:
- Double-click Database Fields in the Field Explorer to expand the list of available tables, and expand each table to reveal all available fields:
- Select the fields to include in the report and drag them to the Details section of the report:
Place all fields as required:
- To preview your report, select Report>Refresh Report Data (
F5)-OR-
Click Refresh
 in the Toolbar.
 - Click OK when the Refresh report data? message displays:
See How to edit a report in the Crystal Designer for details about:
- How to add groups
- How to add a total and field summary (sum, average, etc.)
- How to add a field label
- How to insert a chart
- How to add an image, etc.
- How to add a subreport
The end result could be similar to:

- Select File>Save to save the report.
Note: When selecting File>Save to save the report, check that the Save Data with Report option is not ticked. It is generally unnecessary to save data with the report (and the file size will be reduced). This option sits below the Save option in the File menu.
- The final step is to save the report back to EMu so that the report can be run from within EMu.